Finally ... An English Wheel
Copyright 2007, 2012 by James
P. Riser
Modifying the new Harbor Freight English Wheel
For years I have wanted an English Wheel for making several
items that I want to offer to magicians around the world. I wanted
to locate one that would cost less than the time and materials
if I built it from scratch myself.
Well ... today I located this new item on sale at Harbor Freight
and it followed me home.
Note: This English Wheel needs work to make it useable.
If you are unable to do the required modifications, I suggest
buying a quality kit or completed English Wheel from one of the
better makers of such tools.
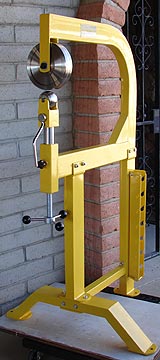
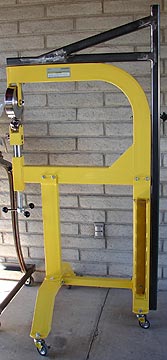
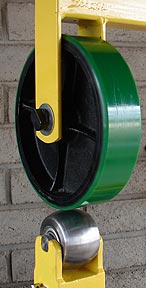
 It is shown here assembled and temporarily mounted
on a low dolly for easy moving (it's heavy). It is on its own
casters now.
It comes with the large upper wheel and one lower anvil/die
(2" radius).
Six additional lower anvils are available by special
order.
The unit features a quick release for easy mounting
and removal of the metal being formed. I will slightly
modify this.
There is an included rack for storing the extra lower
anvils.
The large upper frame may be beefed up for those requiring
a more rigid wheel. I will upgrade this with more steel.
My preliminary testing found that it seems to work
fine for my needs on copper, aluminum, and brass.
There is plenty of clearance for what I want to do
with it.
It is shown here assembled and temporarily mounted
on a low dolly for easy moving (it's heavy). It is on its own
casters now.
It comes with the large upper wheel and one lower anvil/die
(2" radius).
Six additional lower anvils are available by special
order.
The unit features a quick release for easy mounting
and removal of the metal being formed. I will slightly
modify this.
There is an included rack for storing the extra lower
anvils.
The large upper frame may be beefed up for those requiring
a more rigid wheel. I will upgrade this with more steel.
My preliminary testing found that it seems to work
fine for my needs on copper, aluminum, and brass.
There is plenty of clearance for what I want to do
with it.
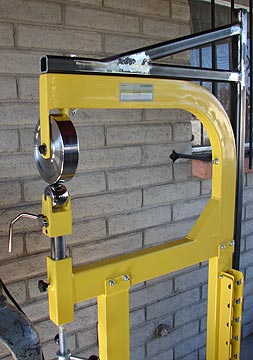
It is easy to move around after the casters got installed.
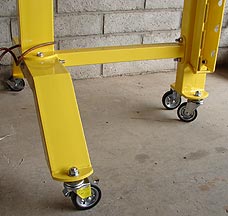 All casters are swivel type and
those at the wheel end are locking.
The unit becomes rather tippy after installing the
casters. I will be hanging a large lead cylinder (2 1/2"
x 20" - heavy) that I have in my scrap pile from the opposite
side of the machine to move the center of gravity away from the
wheel end. I do not want to move the casters out farther to be
under the large wheel. Foot clearance is nice on such a machine
- so counter balance it will be.
All casters are swivel type and
those at the wheel end are locking.
The unit becomes rather tippy after installing the
casters. I will be hanging a large lead cylinder (2 1/2"
x 20" - heavy) that I have in my scrap pile from the opposite
side of the machine to move the center of gravity away from the
wheel end. I do not want to move the casters out farther to be
under the large wheel. Foot clearance is nice on such a machine
- so counter balance it will be.
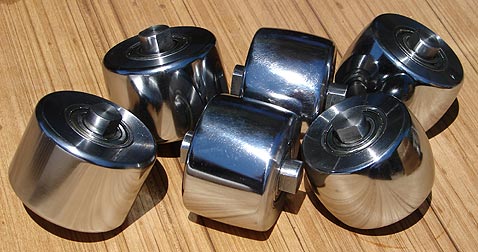
The set of six additional bottom anvils that HF offers
... 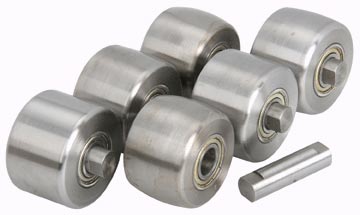 The English Wheel comes with one 2" radius bottom
anvil. These extra bottom anvils are all full radius profiles
and are 3", 4", 6", 8", 12" radii, and
flat. They have finally arrived and I put a high polish on them
- all easy work. They need this improved finish for working the
softer metals that I will be using.
The English Wheel comes with one 2" radius bottom
anvil. These extra bottom anvils are all full radius profiles
and are 3", 4", 6", 8", 12" radii, and
flat. They have finally arrived and I put a high polish on them
- all easy work. They need this improved finish for working the
softer metals that I will be using.
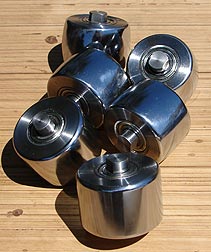
 If you get this set of anvils, be prepared to replace
at least some of the bearings. I had to slightly reduce the diameter
of the axle and the outer race of the new bearings. Several of
the original bearings were too tight a fit and were distorted
by the guy who pressed them in at the factory. The replacement
bearings will easily last the rest of my lifetime - so no big
deal (the bearings are even on sale at Enco right now). This is
what you can expect at bargain prices and should come as no surprise
(Harbor Freight "quality"). The replacement bearings
are also Chinese and speak the same language as the anvils. They
will work well together.
If you get this set of anvils, be prepared to replace
at least some of the bearings. I had to slightly reduce the diameter
of the axle and the outer race of the new bearings. Several of
the original bearings were too tight a fit and were distorted
by the guy who pressed them in at the factory. The replacement
bearings will easily last the rest of my lifetime - so no big
deal (the bearings are even on sale at Enco right now). This is
what you can expect at bargain prices and should come as no surprise
(Harbor Freight "quality"). The replacement bearings
are also Chinese and speak the same language as the anvils. They
will work well together.
Below are several images of the english wheel in action
on a scrap piece of 3003 aluminum .050" thick.
FYI - these are the type of machines used to form fenders
on custom automobiles, fenders on motorcycles, airplane skins,
and things like custom gas tanks on choppers.
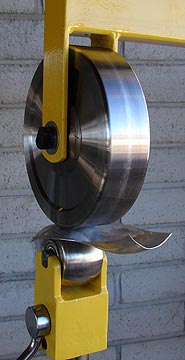
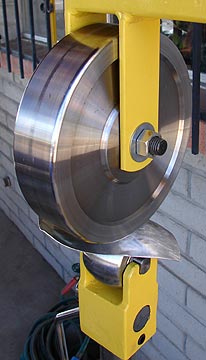


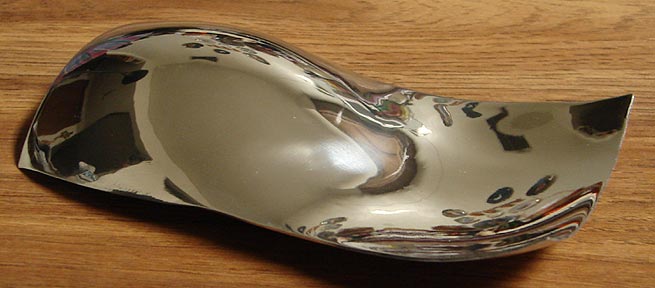
 This is the completed test piece
with a couple compound curves formed into the metal.
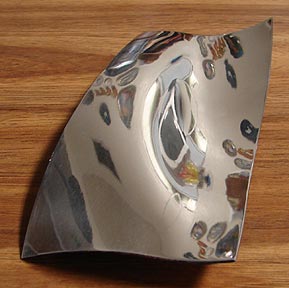
And another sample made...
This is the completed test piece
with a couple compound curves formed into the metal.
And another sample made...


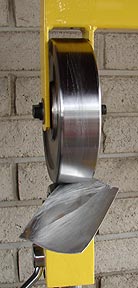
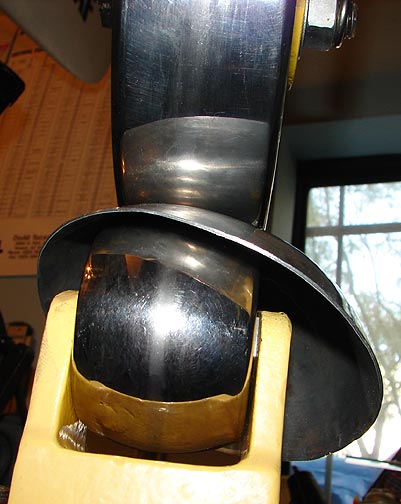
 Too much wheel texture on the
aluminum - so....
I decided to polish up the wheels. The top wheel was
brought to semi-polished finish and the lower anvil to a mirror
finish.
I may eventually mirror finish the top wheel - I got
tired of holding it to the buffer.
Too much wheel texture on the
aluminum - so....
I decided to polish up the wheels. The top wheel was
brought to semi-polished finish and the lower anvil to a mirror
finish.
I may eventually mirror finish the top wheel - I got
tired of holding it to the buffer.
 This improved the
finish on the metal...
This improved the
finish on the metal...  I have been asked about how I polished the wheels.
Here's the info ...
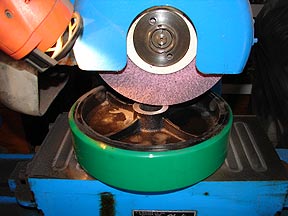
My wheels no longer have any traces of machining. I
did grind away all machining traces with my 2" wide belt
grinder. The belt grit was unmarked but in the 320 range. This
left a satin finish on the wheel. Using a sisal wheel charged
with emery, I removed the satin finish. The wheel was brought
up to a prepolish using a spiral sewn very stiff wheel using a
jewelers chromium green polishing compound. Another 10 minutes
would yield a mirror polish. I just got tired of holding it. It
was held by the spindle and allowed to rotate. I braked it with
my leather glove against the hub to slow down rotation and improve
finish.
I have been asked about how I polished the wheels.
Here's the info ...
My wheels no longer have any traces of machining. I
did grind away all machining traces with my 2" wide belt
grinder. The belt grit was unmarked but in the 320 range. This
left a satin finish on the wheel. Using a sisal wheel charged
with emery, I removed the satin finish. The wheel was brought
up to a prepolish using a spiral sewn very stiff wheel using a
jewelers chromium green polishing compound. Another 10 minutes
would yield a mirror polish. I just got tired of holding it. It
was held by the spindle and allowed to rotate. I braked it with
my leather glove against the hub to slow down rotation and improve
finish.
Once I fix the "quick release" mechanism
and bulk up the frame with some additional steel, it will work
nicely for my needs.
Work has started on this with heating and bending the
handle so that it points in the logical down and out of the way
direction when the wheel is locked "up".


 This heating of the handle destroyed the chrome on
the steel. I'll powder coat it when all modifications are completed.
After bending the handle, I added a spring pin to the
quick release. This is an idea of George Carlson's. You may see
his description here.
This heating of the handle destroyed the chrome on
the steel. I'll powder coat it when all modifications are completed.
After bending the handle, I added a spring pin to the
quick release. This is an idea of George Carlson's. You may see
his description here.
 Here is the spring
pin installed.
Here is the spring
pin installed. 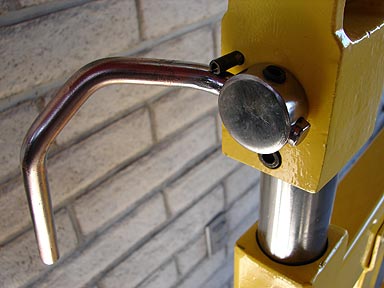 I still need to make a few modifications to the acme
screw top (slightly different than George's modifications). This
end screw modification will be the last improvement to the machine
that I will make or want. Since I am going to be on an extended
road trip, this modification will wait until late summer. The
English Wheel works well without it - I just want to do it to
further improve things and to prevent long term wear on the screw
end and eccentric shaft..
I still need to make a few modifications to the acme
screw top (slightly different than George's modifications). This
end screw modification will be the last improvement to the machine
that I will make or want. Since I am going to be on an extended
road trip, this modification will wait until late summer. The
English Wheel works well without it - I just want to do it to
further improve things and to prevent long term wear on the screw
end and eccentric shaft..
I did get a chance to fabricate the extra steel for
the frame. I used 2" x 2" x 1/4" square steel tubing.
Since I will not live forever and one of my boys might want to
transport the english wheel across the country, I made the extra
steel completely removable for easier transport. Hopefully I can
get it painted in the next couple of days.
 Four bolts attach
it to the frame - two are using the original bottom bolt holes.
Four bolts attach
it to the frame - two are using the original bottom bolt holes.
 This is as stiff as I will probably make it. This tubing
is so heavy that I'll probably not need to hang my lead cylinder
as a counter weight.
This is as stiff as I will probably make it. This tubing
is so heavy that I'll probably not need to hang my lead cylinder
as a counter weight.
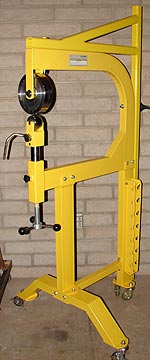 And painted ...

The next little problem to overcome was the looseness
in the axle hole. In use the wheel slightly rises up due to a
small amount of slop between the axle and the axle housing hole.
I installed springs to permanently keep the large wheel in the
"up" position and prevent the slight movement upwards
of the wheel when starting to wheel a piece of metal.


 I ended up using double springs on each side.

 This does the job.
A couple more sample pieces...notice the better finish
on the metal... these images show an "as wheeled" finish
on the metal...


 And another shape ... after lightly hitting it with
an emery charged buffing wheel ...
And another shape ... after lightly hitting it with
an emery charged buffing wheel ...

 And a reverse compound curved piece ... polished ...

 Another trial piece ... polished ...

 Things are almost ready for production projects with
this English Wheel. I am going to like using it.
Things are almost ready for production projects with
this English Wheel. I am going to like using it.
Making a Small Pitch Bowl
Below are several pictures of making a small aluminum
pitch bowl for chasing and repousse work. This bowl started out
as a disc of 3003 aluminum.

 This bowl has the smallest curve radius that I can
make with the HF English Wheel.
This bowl has the smallest curve radius that I can
make with the HF English Wheel.

 In use, this bowl will be full of pitch and rest on
a leather or rubber "donut" or even a sandbag. I left
the natural edge as the bowl came from the wheel. It can be smoothed
up with a belt grinder if desired.
In use, this bowl will be full of pitch and rest on
a leather or rubber "donut" or even a sandbag. I left
the natural edge as the bowl came from the wheel. It can be smoothed
up with a belt grinder if desired.
A soft wheel...
For certain jobs I will want to use a soft upper wheel.
I found a caster perfect for the job.
 The hub was too wide for the frame - so I ground off
what was needed on my surface grinder. Both ends of the hub were
ground down to bring them in line with the wheel rim.
The axle on the English Wheel is 20 mm. in diameter.
I have ordered caster type precision ball bearings to fit the
hub hole. I'll machine a new axle to fit the bearings when they
come in.
The hub was too wide for the frame - so I ground off
what was needed on my surface grinder. Both ends of the hub were
ground down to bring them in line with the wheel rim.
The axle on the English Wheel is 20 mm. in diameter.
I have ordered caster type precision ball bearings to fit the
hub hole. I'll machine a new axle to fit the bearings when they
come in.
 This is how the
wheel will look once the bearings and new axle are installed.
This is how the
wheel will look once the bearings and new axle are installed.
 In actual use, portions of the formed metal would be
used to make up more complex shapes. I already have the necessary
shears for cutting what I need from custom free form shapes. These
cut out shapes are usually welded into the final structure.
Note: There will be what I term "tool snobs"
who will poo-poo this english wheel. If I had designed and welded
it up myself, it would be fine in their eyes. But since it has
the Harbor Freight label on it, it is open game for these "tool
snobs". I certainly have my share of old American Iron and
know its value. I also know when a new and inexpensive tool can
be profitably utilized. I try not to get caught up in the "my
wheel is larger or better than yours" mentality. All I care
about is if it will reliably work as I intend it to. This
wheel, as modified, will work well for me. Under no circumstances
should this wheel as sold be considered workable nor a
professional tool. Even with the modifications that I have made
to it, it still will not compare with a quality designed and made
English Wheel. But, it very well does what I need it to
do - so I have shared my modifications assuming it can also work
for others able to modify it as needed. One of my bigest concerns
was how well the flat anvil would align with the upper wheel after
all of the modifications. Well, it's as perfect as can be! If
you can make the above described modifications, you will have
a nifty little English Wheel at a bargain price.
One criticism of this machine by the "tool snobs"
is that the anvils do not have flats on them. So what? This is
an easy fix that does not require a lathe - only a decent belt
grinder. I have found this english wheel to work perfectly for
my needs without these flats on the anvils - so I have not
put them on the anvils. For those thinking they need these flats,
here is an easy way to do the job. The anvil mounted on its axle
is held by the axle ends so that the anvil may freely turn. The
only tool required is a belt grinder with a platten. The anvil
alxe is held at a 45 degree angle - I always hold the left side
higher and the right end lower to create this angle. The other
way will work just fine. If you slowly and gently bring the center
high spot of the anvil against the belt backed by the platten,
you will notice that the anvil will pick up speed. When it is
revolving rapidly, apply a little more pressure against the platten.
This will slowly and concentrically grind a flat on your anvil
to whatever size you think you require. After the flat width is
established, move down to the rubber tired drive wheel of the
grinder and slowly blend the flat into the curvature already on
the anvil. Do this slowly and everything will be concentric. Buff
the anvil and you will have the "required" blended in
flat. The 2" wide belt I use for this type of work is labelled
150MX and has an angled butt joint on the ends - not an overlapped
joint. This prevents a "thump" everytime the joint comes
around. This type of belt will give a very smooth finish to the
anvil. I am able to go from this belt grinding directly to the
sisal wheel charged with emery for a nice prepolish.
If this info has been helpful, please email me at James P. Riser
to let me know. Thanks.
When I get some time, I'll test it out on stainless
steel and cold rolled sheet steel - I'm too busy right now (but
HAD to at least try it out).
In actual use, portions of the formed metal would be
used to make up more complex shapes. I already have the necessary
shears for cutting what I need from custom free form shapes. These
cut out shapes are usually welded into the final structure.
Note: There will be what I term "tool snobs"
who will poo-poo this english wheel. If I had designed and welded
it up myself, it would be fine in their eyes. But since it has
the Harbor Freight label on it, it is open game for these "tool
snobs". I certainly have my share of old American Iron and
know its value. I also know when a new and inexpensive tool can
be profitably utilized. I try not to get caught up in the "my
wheel is larger or better than yours" mentality. All I care
about is if it will reliably work as I intend it to. This
wheel, as modified, will work well for me. Under no circumstances
should this wheel as sold be considered workable nor a
professional tool. Even with the modifications that I have made
to it, it still will not compare with a quality designed and made
English Wheel. But, it very well does what I need it to
do - so I have shared my modifications assuming it can also work
for others able to modify it as needed. One of my bigest concerns
was how well the flat anvil would align with the upper wheel after
all of the modifications. Well, it's as perfect as can be! If
you can make the above described modifications, you will have
a nifty little English Wheel at a bargain price.
One criticism of this machine by the "tool snobs"
is that the anvils do not have flats on them. So what? This is
an easy fix that does not require a lathe - only a decent belt
grinder. I have found this english wheel to work perfectly for
my needs without these flats on the anvils - so I have not
put them on the anvils. For those thinking they need these flats,
here is an easy way to do the job. The anvil mounted on its axle
is held by the axle ends so that the anvil may freely turn. The
only tool required is a belt grinder with a platten. The anvil
alxe is held at a 45 degree angle - I always hold the left side
higher and the right end lower to create this angle. The other
way will work just fine. If you slowly and gently bring the center
high spot of the anvil against the belt backed by the platten,
you will notice that the anvil will pick up speed. When it is
revolving rapidly, apply a little more pressure against the platten.
This will slowly and concentrically grind a flat on your anvil
to whatever size you think you require. After the flat width is
established, move down to the rubber tired drive wheel of the
grinder and slowly blend the flat into the curvature already on
the anvil. Do this slowly and everything will be concentric. Buff
the anvil and you will have the "required" blended in
flat. The 2" wide belt I use for this type of work is labelled
150MX and has an angled butt joint on the ends - not an overlapped
joint. This prevents a "thump" everytime the joint comes
around. This type of belt will give a very smooth finish to the
anvil. I am able to go from this belt grinding directly to the
sisal wheel charged with emery for a nice prepolish.
If this info has been helpful, please email me at James P. Riser
to let me know. Thanks.
When I get some time, I'll test it out on stainless
steel and cold rolled sheet steel - I'm too busy right now (but
HAD to at least try it out).